Guide For Importing Sales Data
First you need to create a report from your POS that has five things in a CSV or EXCEL Spreadsheet. You may import all showrooms at the same time over any timeframe but I suggest monthly for the first attempt.
1. Showroom ID
2. Salesperson ID
3. Date (by day)
4. Sales Amount
5. # Transactions
To get to this portion of the site Click on the Administration tab then select the Import Mapping Tab as shown below:
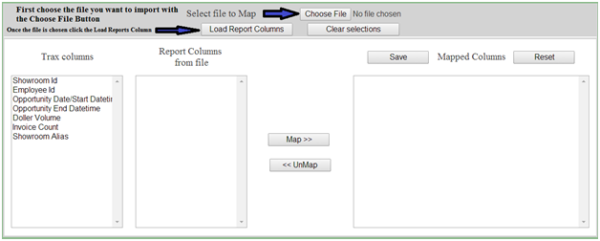
You will need the file for importing which you will select with the Choose File Button.
Once this is chosen you will click the Load Report Columns Button.
Once this is done the page should look like the following:
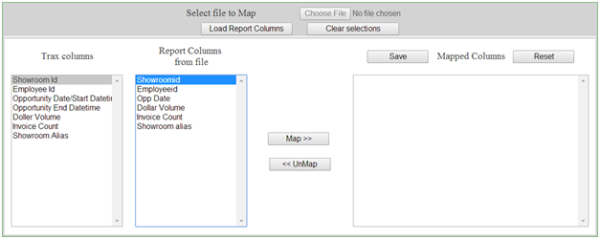
Now you will select Showroom ID in the Trax Columns with a left click highlighting the field blue, then you will select the Showroomid from the Report Columns from file field with a left click also highlighting the field blue. This should look like the following picture:
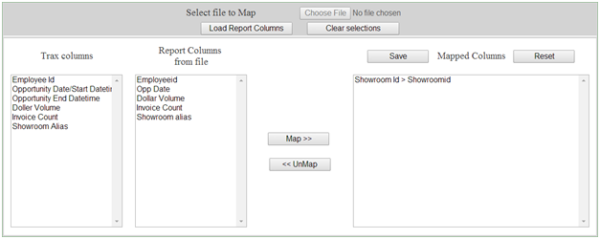
Once this is done you will click the Map >> button which will then add the columns now mapped together to the Mapped Columns field which is displayed in the picture below.
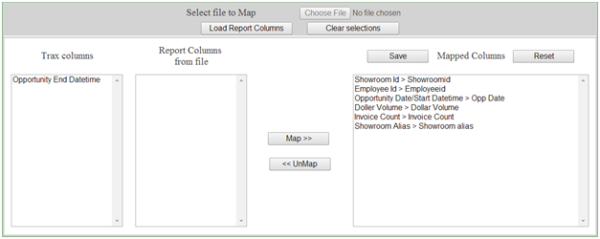
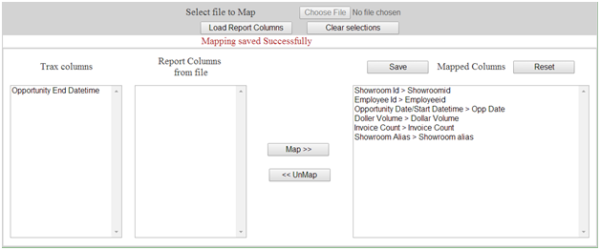
Then you will map all the Trax Columns fields to the Report Columns from file fields leaving Opportunity End Datetime only under Trax Columns. Example shown below:
To complete this you must left click the Save button above the Mapped Columns completing your mapping of the import file. It will look like the following picture when done properly:
This concludes how to map your file for importing. Next up Importing the file.
“Back for more TraxSales Visual Proof Basic Training”
"If you can't track it, then you can't manage it"
Contact
Sales@TraxSales.com Support@TraxSales.com
Office: 713-466-7177
First you need to create a report from your POS that has five things in a CSV or EXCEL Spreadsheet. You may import all showrooms at the same time over any timeframe but I suggest monthly for the first attempt.
1. Showroom ID
2. Salesperson ID
3. Date (by day)
4. Sales Amount
5. # Transactions
To get to this portion of the site Click on the Administration tab then select the Import Mapping Tab as shown below:
You will need the file for importing which you will select with the Choose File Button.
Once this is chosen you will click the Load Report Columns Button.
Once this is done the page should look like the following:
Now you will select Showroom ID in the Trax Columns with a left click highlighting the field blue, then you will select the Showroomid from the Report Columns from file field with a left click also highlighting the field blue. This should look like the following picture:
Once this is done you will click the Map >> button which will then add the columns now mapped together to the Mapped Columns field which is displayed in the picture below.
Then you will map all the Trax Columns fields to the Report Columns from file fields leaving Opportunity End Datetime only under Trax Columns. Example shown below:
To complete this you must left click the Save button above the Mapped Columns completing your mapping of the import file. It will look like the following picture when done properly:
This concludes how to map your file for importing. Next up Importing the file.
“Back for more TraxSales Visual Proof Basic Training”


